Category Archives: The House on Fremont Street

The House on Fremont Street: Washi tape Instagram photo wall

Remember when I forced you to choose a washi tape for us to use on our office’s Instagram photo wall?

Washi Tape Instagram Photo Wall

Well, you didn’t like either of the choices — gold or navy — but I was too anxious to get the photos on the wall, so I grabbed the gold tape and went to work, thinking that I could easily switch it out when I finally decided on something better… But, we all know how this story ends, don’t we?

All of these weeks later, it’s still up, with the gold washi tape, and I love it.

Washi Tape Instagram Photo Wall

Washi Tape Photo Wall

Instagram Photo Wall

I need to order more photos to fill that entire section of the wall, from the ceiling to the bottom row of photos, which is short a few. The spacing is less than perfect and the photos aren’t all straight as arrows, but, it doesn’t bother me a bit. (Maybe it bothers Josh a little. It’s hard to turn that engineering brain off sometimes.)

The washi tape is holding pretty well on the painted wall. I do go over it from time-to-time and rub my thumb over the tape to keep it secure. I don’t think it will hold forever, but maybe we’ll be ready to switch up the pictures by then anyways.

The House on Fremont Street Office

As you can see, we still have some work to do on that office wall. I have a few more family photos to add and I’d love to add some graphic artwork, too (maybe like this Pinterest inspiration?).  I’m still dreaming of a long desk space that runs along the entire wall, with room for both Josh and I to have work space, as well as a spot for the girls to sit and work on homework, but, for now, this works well enough.

Did I convince you that the gold washi tape looks okay against the navy wall? Or are you hating me for it? Be honest. I can take it.

The House on Fremont Street Widget

The House on Fremont Street: Living room floor lamps for under $150

Long story short, we need a floor lamp.

Long story long, this is the first fall we’ve spent in our house and we’re realizing that our living room is very dark. In fact, there aren’t any lights in our living room. We’ve been tossing around adding a row or two of can lights, but in the meantime, we need a floor lamp.

But, I kinda hate floor lamps. They can be so ugly. SO UGLY. Let me try that again… floor lamps that don’t cost $300 can be SO UGLY.

That’s better.

Here are a few that I have my eye on for our living room, all for under $150 each. Any favorites?

Floor Lamps Under $150

 one.
Threshold Seeded Glass Industrial Floor Lamp, Target (Online only), $90
Target Floor LampI really like this one and I think it would be a good fit in our living room and would give off a lot of indirect light from the clear shade. It comes with an Edison Bulb, which is cool, too.

two.
RANARP Floor/Reading Lamp, Ikea (In-stores only), $60
Ikea Floor LampI’ve had my eye on this lamp from Ikea for a while. I love the brass details and the white would look really fresh against the backdrop of our deep blue living room walls. (Who’s going to Ikea soon?)

three.
Pharmacy Floor Lamp, Target (Online only), $130
Target Floor LampThis lamp is a bit more traditional and it’s probably my least favorite on the list, but there’s something about it that I do like.

four.
Contrast Cord Floor Lamp, Urban Outfitters (Online only), $149
Urban Outfitters Floor LampThis one is fun and funky and the contrasting orange cord is a nice touch.

five.
Cantilever Lamp, Urban Outfitters (Online only), $149 (Currently on sale for $129)
Urban Outfitters Floor LampThis one caught my eye and I love the shape and that wood handle. However, I worry that adding more blue to our living room would be a mistake.

six.
Stella Floor Lamp, Urban Outfitters (Online only), $129
Urban Outfitters Floor LampThis lamp from Urban Outfitters is a fan favorite and I know a few people who have it. It’s a little frilly, but that might be a good contrast in our not-so-frilly living room.

The House on Fremont Street: Coat closet makeover

We’ve been working, in bits-and-pieces to give our coat closet a makeover, in an attempt to make it more functional for us, and especially for the kids, and I’m excited to say that after a month of work, it’s complete! (You can read about how we got started and our brainstorming process.)

(Please excuse the not-so-great pictures. There isn’t much room in our entryway to back up and get a full-length shot and it’s dark out today, so my apologies!)

Here’s what it looked like before:

Coat Closet Makeover

Coat Closet Makeover

And, here’s what it looks like now:

New Coat Closet Doorknob and Hinges

New Coat Closet Closeup Top


New Coat Closet After

Coat Closet Makeover

We were inspired by Playing House Full Time, who did these incredible Pinterest-esque wall in their own home on a whim one night. I’m not sure we pulled off recreating the same look in our closet (because, um, angles and corners), but we love how it turned out.

The gray is the same color we used in our bedroom (String from Pantone, available at Lowe’s) and the dark blue is the same that’s in our living room (Moroccan Blue from Pantone). The mint-ish blue is a new color for us (Bay from Pantone), but I’m loving it and I think I’ll use it in the girls’ room, too. We used semi-gloss for all of the paint in the closet, on the trim and on the door because we have little people with little hands that are often covered in dirt. There’s a lot of wall washing in this house.

New Coat Closet Closeup Bottom

This pattern wasn’t our original plan for the closet — we had painted the entire closet that deep blue as the base of our previous plan (there were arrows involved) — and I think that I would have prefer all of the blue to be white, but I love it, just the same and think it’s a fun, bold design in this small space.

We also went with a much simpler route for the hooks than we’d originally planned. Once we dove into adding the design on the walls, I knew that I’d need to scale back on the hooks. I nearly ordered these from Land of Nod, but they were back-ordered and I just couldn’t wait another month to get our coats in the closet. I could see adding them at a later date, if we feel like these aren’t strong/big enough to hold our gear, but for now, they’re great.

New Coat Closet Closeup Floor

Here’s to hoping that the coat closet makeover will help keep our small entryway a little more organized! The kids are still learning to put it to use, after an entire month of just dumping their backpacks and coats on the floor in the living room, thanks to being closet-free. But, baby steps, right? So far, they seem to be able to reach their backpacks easily and I’ve noticed that shoes are actually in the closet in the morning, rather than scattered around the house, so I think we’re on to something…

New Coat Closet Before and After

Cost breakdown:

  • Paint: We already had the blue and white paints, but bought a fresh gallon of gray and a quart of mint. $50
  • Tape: I try to splurge on Frog Tape, when I can. It’s worth it. $12
  • Wood trim for hooks: We already had these in Josh’s stash of wood. $0
  • Hooks: Available from Target. $18
  • Rug: I stole the one from the front door. $0
  • Shoe baskets: They are similar to this one from Target, but they were on clearance at the store. $18
  • Doorknob & hinges: I need to check with Josh to see the exact ones he bought. I’ll update it later. $30

TOTAL COST: $128 

Here’s an update on our to-do list:

  • Demo out the shelf and bar: Complete!
  • Add a switched light fixture: Complete! We ended up using a can light to give us more space and we love it!
  • Paint the inside of the closet: Complete!
  • Possibly add a bench: We decided that a bench would be too much. In other words, Josh was right.
  • Add boards: Complete!
  • Add hooks: Complete!
  • Paint the door, inside and out: Complete! We weren’t going to do this yet, as we’re still planning what the rest of the entryway will look like, but this door was so dull and we couldn’t help ourselves. The fresh coat of white is very nice.
  • Add a new doorknob and hinges: Complete! Again, we weren’t planning on diving into this pool yet, but we found some we liked and that didn’t cost a fortune, so there wasn’t any reason not to get started with this door. You have to start somewhere, right?

Still on our to-do list for the coat closet:

  • Replace the flooring to continue into the closet from the entryway: Another big decision that we have yet to make. I mean, as much as I love (cough, cough) that blue and white linoleum, I think it’s got to go. I could dedicate an entire post to the crazy flooring ideas I’ve tried to talk Josh into.
  • Add additional storage: The door is hallow, so while I was originally thinking that I’d add some baskets for additional storage, I know that won’t work. (Because Josh told me so.) I am on the hunt for some lightweight, easy-to-hang folders or small bins for the kids to dump their school papers as they unpack their backpacks after school.

We’re trying to decide on our next project… I think that since we’re on a roll with the coat closet in the entryway, we should continue and finish the entire space. Another possibility is the entry from the garage into the house (we need to build a shoe rack, revamp the step and freshen up the door). Or, maybe the closet in our bedroom, which needs some space rearrangement and storage solutions, big time.

The House on Fremont Street Widget

The House on Fremont Street: A coat closet makeover (Phase 1: Ideas)

Coat Closet Makeover

Right inside our front door, we have a little coat closet. It’s not much, but it’s lovely to have, especially after not having a coat closet in our last three homes. Honestly, sometimes I even forget that it exists and wander around the house looking for my coat. When it’s in the closet.

Our entryway is tiny all together and we’re planning on giving it a makeover in late fall/early winter, but we’re starting with the coat closet so that it’s more functional for back-to-school.

Coat Closet Makeover

Because, right now, it looks like this. Please note all of the wasted space on that shelf. Also, that the hanging bar works great for Josh and me to hang our coats…. but not so much for the kids.

Coat Closet Makeover

The bottom is a major disaster and during the school year, it’s even worse, as there are usually a few backpacks hanging out on the floor too. In theory, the little basket is for kids’ shoes and the big basket is for grownup shoes, but we all know how that ends… a big pile of everyone’s shoes.

Coat Closet Inspiration

Photo via The Real Housewives of Riverton
Check it out on Pinterest

I was originally inspired by this closet that I found on Pinterest and thought it could add more function to the closet.

Coat Closet with Bench

Original photo source unknown
Found on Pinterest

I also loved how this closet had a little bench in it, where the kids could sit down to tie their shoes.

So, here’s the plan for our coat closet revamp:

  • Demo out the shelf and bar: This is Josh’s department.
  • Add a switched light fixture: Here’s where being married to an electrical engineer comes in handy! I’m just thinking a simple, easy, inexpensive fixture, like this, to provide some light in the closet. Our entryway (and house!) is pretty dark inside and we need all of the light we can get…
  • Paint the inside of the closet: At first, was thinking big, bold stripes, but now I’m leaning towards a solid punch of color… like coral. I’m also thinking about some wallpaper after I discovered these on Urban Outfitters.
  • Possibly add a bench: Josh thinks it will be in the way. I think it will be handy. We’ll just have to see.
  • Add boards: Painted bright white, for the hooks to be screwed into. Nothing fancy, just some 1×4″ wood in something cheap, but nice.
  • Add hooks: There will be 12 all together, with two on each wall of the closet, one lower row for the kids to access and one higher row for us. I’d love to do a few of these B&W Wall Hooks (Anthropologie, $18 each) on the wall that you see in the back, with some simple hooks for the rest. I saw these Ironwork Wall Hooks on Anthropologie as well, but I’m pretty sure I can get all 12 for the same price ($14 each!) and spray paint them exactly the color I want.
  • Add additional storage: We might add some additional storage on the back of the door with wire baskets, if we can find a way to attach them securely. It would be nice for the kids to have a spot to throw wet hats and mittens. Or for me to stash my clutches.

For down the road, as we give the entryway a makeover this fall/winter:

  • Paint the door, inside and out: Still figuring out what we’re going to paint in the entry, so to be determined.
  • Add a new doorknob and hinges: Oil rubbed bronze? Black? The entire house needs new knobs and hinges, so, again TBD.
  • Replace the flooring to continue into the closet from the entryway: Another big decision that we have yet to make. I mean, as much as I love (cough, cough) that blue and white linoleum, I think it’s got to go.

The House on Fremont Street Widget

The House on Fremont Street: Washi tape decisions

Office Space

We have this big, blank wall in our little office space in our house, which sits in the living room. It’s not big and Josh is the one who mainly uses it, as that desk is a little high for me and I usually set up camp with my laptop somewhere else in the house. Down the road, I have dreams of something like this for our office space, where the kids can sit to do homework and where I can have a more permanent work space, but until then, this works for us and it’s pretty low on the priority list for The House on Fremont Street.

I still can’t find the picture that inspired me, but when we first moved in, I saw a wall, somewhere (Pinterest? Instagram?) where they’d simply used washi tape to hang their printed Instagram  pictures on the wall. It was easy, but cool and I loved that I could keep adding Instagram pictures as I took them, and/or change them out as new favorites popped up.

Instagram Photos- Pictures

So, I printed some Instagram pictures from my account… and then they sat there. For a couple of months.

Oops.

Instagram Photos- Washi

I’ve been having a hard time deciding on which washi tape I should use to hang them. I finally bit the bullet and ordered a couple from Etsy (the navy and the gold, both from Beve by Lauren Fish), but I’m still on the fence about how I feel. Maybe the pattern isn’t bold enough?

Instagram Photos- On Wall

Which one do you prefer? The gold? Or the navy? Or, should I try to find something new? Maybe a black and white stripe? Or a glittery gold? (Life is SO HARD sometimes.)

I’ll be sure to update you when we’ve hung them on the wall. It’s going to take some measuring and some straight line action, which means I’ll need Josh’s help. Obviously. I can’t see a straight line if it smacked me in the face.

 The House on Fremont Street

The House on Fremont Street: The dreaded hall closet

Hall Closet

We have this tiny, skinny closet in our hallway. You see it as you come in the front door and I suppose that it was intended to be a pantry, as it’s on the backside of the kitchen.

When we first moved in and unpacked, I started to organize it as I went, because obviously that would make the most sense and get it done quickest, right? But, that plan quickly flew out the window and less than a day in, I just started cramming anything and everything in there. I knew it was all stuff that would live in there, but it also become a bit of a catch-all for anything I didn’t want to deal with at the moment.

And, much to Josh’s delight, eventually it started overflowing into a nearby laundry basket, that I stationed there, just for that purpose.

Three months later and it all still sat there, waiting to be put away and organized. In fact, this is how it looked, as of just last weekend:

Hall Closet Before

I told you it was bad. I’m cringing just looking at this picture. Oddly enough, I did know where everything was in there, so… Here goes nothing!

Hall Closet Basket

First, I took it all out to access the damage. This is just the stuff that was in the extra laundry basket.

Hall Closet Everything

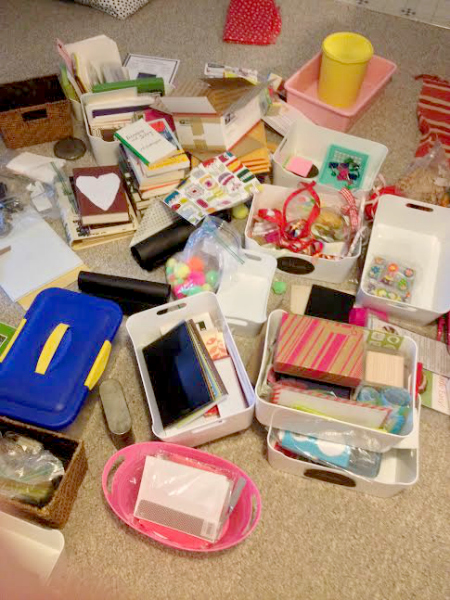
And, this was everything. Cards. Stationary. Wrapping supplies. Ribbons. Pens. Shipping supplies. Notebooks. Baskets. Cellophane Easter bags. Books. Poof balls. Glue sticks. Envelopes. So many envelopes.

Organizing it wasn’t hard. Most everything went back in the closet and since this stuff had all come from the hall closet in our Seattle home, it was already semi-organized and there were pre-determined bins for everything — stationary, wrapping supplies, extra craft supplies (we keep most of them out in the kitchen on a bookshelf for the kids to easily access), notebooks, ribbons, etc.

Hall Closet Top

Top shelves:
Extra baskets, craft paper on a roll, stationary & note cards, note pads & blank paper
Not pictured in the back row: A bin of office supplies and extra small boxes for mailing gifts

These bins from Ikea are a lifesaver. I have dozens of them around our house to stay organized. I couldn’t find the exact bins online anymore — I’m hoping they still carry them in the stores! — but these PLUGGIS Recycling Bins ($7 each) are pretty close.

Hall Closet Middle

Middle shelves:
A bin of wrapping supplies and a bin of ribbons. A little bin for sticky notes, tape & washi. Yet another bin of note cards (I have SO many, but I love them!) and a spot for pens. Homework racks for when school starts and two empty magazine bins.

As you can see, we have some room to grow in this closet, which is nice and that I know we’ll appreciate when school starts and all of the paperwork starts rolling in and homework ramps up.

Hall Closet Bottom

Bottom shelf:
A rack for papers for the kids (blank, lined and construction). Crafts in the back, including the best-ever craft kits lovingly made by one of my SILs. A basket for playing cards. A larger file bin for instruction manuals and home papers. A bin for party supplies and a couple of extra bins and baskets.

Hall Closet After

I’m not sure how this closet will be used and change as we live in our house more, but at least it’s organized now, which is a good start.

Eventually, maybe this fall/winter, I’d like to continue to give this space a mini-makeover including:

  • Painting the inside of the closet and the shelves, or possibly using wallpaper to give it some spunk
  • New doorknob (the entire house needs them, really)
  • Possibly a fixture inside of the closet to give it more light
  • New light fixture above the closet
  • Possibly paint the inside of the door with chalkboard paint?
  • Paint the outside of the door a fun color… To be determined as we make a plan for the hallway

The House on Fremont Street

The House on Fremont Street: A last-minute modern picnic table

Sometime last month, I was at Target to grab one thing (literally, ONE THING), when I noticed they were clearing out all of their outdoor furniture and accessories to make way for school supplies. Everything was discounted, majorly, including the picnic table that we’d been eyeing since forever.

Target Threshold Picnic Table

Threshold Bryant Faux Wood Patio Picnic Table, Target, available online, $254

They only had the display model left, but it seemed to be in pretty good shape (plus, they offered me an extra discount to make up for it…) and Josh happened to be out running errands in the truck, so I snagged it.

Target Picnic Table

The rug (Threshold Rectangular Patio Rug in Navy Chevron) was a last minute add-on that I grabbed on the way out. It was heavily discounted as well, so I think it was less than $20. It’s a little small for under the table, but it does the job of keeping the table in place and giving a soft spot for barefeet to rest. It’s an indoor/outdoor rug, so I’ll clean it up and move it inside when summer comes to an end.

What was originally a $300 table came to under $70, with tax. Um, I can’t even tell you how insanely excited we were. I think it was discounted at 60 percent off and I had an extra 10 percent off using my Target Cartwheel app (do you use it? it’s awesome.) and another 10 perfect off for the display model discount. I’m not sure that really adds up, but however we got there, it was a steal.

Target Threshold Picnic Table

It seems small at first glance, but it’s the perfect size for our little deck (which we have plans to expand/turn into a larger patio/do something with in the future) and for our family to sit around for dinner, which we do as often as we can.

The kids love sitting out there to color or craft as well. It’s plastic, not wood, so it cleans up very nicely and lasts through summer storms without getting damaged. Josh and I also love that the benches are attached to the table. Our kids are squirmy and benches that tip over can be risky business.

Patio Table House

(I’m dying to paint that door. And add a new light fixture. And paint stripes on the deck. Poor Josh.)

Looking forward to many, many more summer dinners at this table, at this house, with my sweet family. There’s something so peaceful about eating outside. The kids seem to eat more when we’re outside and we tend to linger longer afterward, or the kids leave the table to play in the grass while Josh and I catch up on the day…

… and pour another beer or two.

The House on Fremont Street

The House on Fremont Street: nousDECOR (Giveaway)

// This giveaway has ended. Please click HERE to see the winner. //

You know that I’m already a heavy Pinterest user, right? Obsessive might be a better word. Especially as we’ve been pulling the details of our new house together, my Pinterest boards have kept me organized and sane, as I pull ideas, inspiration photos and products for each room.

However, as much as I love Pinterest, sometimes, it leaves something to be desired. I don’t claim to be anything close to an interior designer. Sometimes, I play one for work (my special talent is sourcing the perfect products), and I certainly know what I want and like for my own home, but that’s as far as I can go. In addition, I try to stay as far away from scary editing photos, like Photoshop, as possible, so pulling together those gorgeous pin-worthy interior collages that you see on design blogs is way out of my league.

nousDECOR Logo

Enter nousDECOR(you say it “new” decor, in case you were wondering…)

The newest online design tool on the block, nousDECOR is like a cheat sheet for those of us who didn’t exactly attend design school, but who want to create spaces in their homes that look like we did.

The main feature of nousDECOR is being able to take a picture that inspires you, for your own home, and to pull products, straight from the extensive catalog on nousDECOR, to create a custom moodboard.

Here is an image (on the left) that I pinned to my Pinterest account long, long ago, for living room inspiration, and the moodboard that I created on nousDECOR to create a similar look:

nousDECOR on bellingFAM

If you click through on the image above, you’ll see that when you’re on the moodboard, you can click on each product I chose, which will take you to the website where you can buy it. For example, if you can’t live without that rug (which everyone and their MOTHER has right now!), click on it, read more about its details from nousDECOR, then click on the BUY button. Easy as that.

nousDECOR Products

One of my other favorite features is that as you pull products for a room on your moodboard, it keeps a running total of how much the design elements you’ve picked will cost. If you look above, you can see that these products are at around $1650.

Isn’t this cool? You really just have to get onto nousDECOR and play around to get the feel of it!

There are a million amazing features built into nousDECOR, but here are some of my other favorites…

  • See a room that you love on nousDECOR, but it’s about 900 times out of your budget? Click on the moodboard, then click on each item and use the “SAME LOOK, DIFFERENT PRICE” button to search for similar items at different price points.
  • Have a room that you love but can’t find the products to recreate it? Have a couch that you can’t seem to find the perfect rug for? Try nousDECOR’s SEEKING HELP feature. You can upload a photo of what you need help with, then put it out there for the nousDECOR community to give you feedback, including their in-house designers and Chief Designer, Mark Cutler.
  • For those of you who fill your homes exclusively with “flash sale” decor (such great deals on those sites!), but you get tired of hunting and hunting and hunting through them to find what you’re looking for, as you’re creating your moodboard, click the SHOW FLASH SALE FIRST button to give you products straight from all of those sites. There is also a SHOW DIY FIRST button for products that you can easily recreate at home.

Okay, honestly, the best thing to do is to jump on to nousDECOR and play around. There are so many cool, thoughtful features and it’s SO EASY to use. I can’t emphasize that enough. Plus, it’s fun!

To get you started on nousDECOR, they are hosting a giveaway for one of the stores where you can pull products on nousDECOR, as you create your moodboards… and one of my personal favorites for home decor, Anthropologie(I used to work there. I was awesome at folding the bedding. Seriously.) One bellingFAM reader will win a $100 gift card for Anthropologie.

To enter to win a $100 ANTHROPOLOGIE GIFT CARD, please click the Rafflecopter link below:

// This giveaway has ended, please click the link below to see the winner. //

bellingFAM Giveaway for $100 Anthropologie Gift Card from nousDECOR

(If you’ve never used Rafflecopter before, I promise that it’s easy and the BEST and safest way to enter a giveaway on a blog, as well as for me to run a giveaways on bellingFAM. No registration necessary. All of your information provided is kept private. U.S. residents only, please.)

Giveaway provided by nousDECOR. No other compensation was taken for this post.
All opinions are my own, as always.

The House on Fremont Street: Everett’s room


Everett's Room

It’s impossible to photograph Everett’s little room in one shot, so here it is in bits and pieces.

Can we take a moment for the wall, please? (tutorial later. when i’m feeling less traumatized. scratch that. when josh is feeling less traumatized. ditto for the paneled ceilings. we haven’t even discussed those yet!)

Everett's Room

Everett’s room is nearly done, despite a few finishing touches and things that we’ll do further down the road, like painting the inside of his closet and creating better storage in there and upgrading the blinds. I’ve been playing with the idea of adding a cover to his duvet, maybe this one from Pottery Barn Kids, but I’m still on the fence. I don’t want his room to feel too heavy or over-designed. The curtains are even pushing it, in my opinion.

Everett's Room

See that little Seahawks helmet lamp? It was Josh’s when he was a kid. Talk about being a lifelong fan. I’m on the hunt for a new shade…

We didn’t have a place for that Seattle map in the rest of the house, so we hung it in here. I think it gives a nice pop of color to his room. I want to cover that wall with all Seattle/Washington/Northwest-inspired art work for a little gallery. I’ve been pinning some ideas here.

The best part about his room is that we pretty much already had everything we needed. I did add that tiered basket for his trucks. It’s the Ladder Storage Basket from Urban Outfitters (currently on sale for $59) and it gives a nice industrial touch to his room, while also giving us an easy spot to toss the random trucks and cars we find around the house.

Everett's Room

A closeup of the wall. The insanely perfect wall. I kind of want to hug it. The mug and wooden letter are both from Anthropologie. They still carry the Monogram Mug ($8), in case you can’t live without one of your own.

The House on Fremont Street

The House on Fremont Street

The House on Fremont Street: Construction zone

This is the scene at our house this morning.

Flaggers. Backhoes. Cones. No parking signs. Compressors. Guys drilling into concrete.

After a chilly month at The House on Fremont Street, we’ve having gas brought to the house and a new heating system installed, replacing those old, dangerous in-wall heaters that were single source of heat when we moved in… and that we promptly ripped out so that we could paint.

Long story short, our house has been a bit on the chilly side since we moved in!

It happened that both installs, gas and heat, landed on the same week, so we’ll be living in a construction site, of sorts for the next few days. I don’t think Everett will mind one little bit.

Here’s to having dry bath towels, being warm when we get out of bed in the mornings and to on-demand hot water.

(can you hear the angels singing? i can.)

The House on Fremont Street